Updated on: 11 December 2025
Previous post
Add paragraph text. Click “Edit Text” to update the font, size and more. To change and reuse text themes, go to Site Styles.
Next post
Add paragraph text. Click “Edit Text” to update the font, size and more. To change and reuse text themes, go to Site Styles.
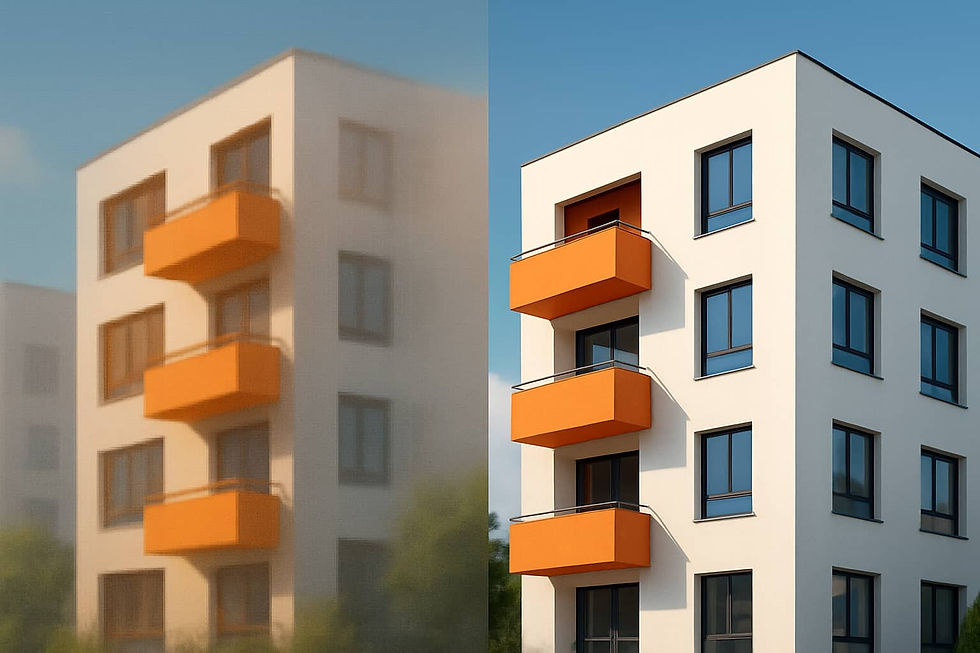
Architectural images often start as small renders, screenshots, or scans that look soft when you enlarge them. AI upscaling promises to turn these into sharper, higher resolution visuals without re rendering the whole scene. For architects and visualization artists, the real question is whether AI upscaling can do this reliably while keeping design intent intact.
In this guide, you will see what AI upscaling actually does, when it makes sense to use it, and where it can fail. We will look at how it works in simple language, how ArchiVinci’s Simple 4x and Generative 2x modes fit into real workflows, and what to watch out for with lines, materials, and people. By the end, you will know when AI upscaling is a smart, controlled tool and when a fresh render is still the safer choice.

What Is AI Upscaling in Architectural Visualization?
AI upscaling is the use of artificial intelligence to increase the resolution and clarity of architectural renderings by intelligently adding detail to low-resolution images. Instead of just stretching pixels, the model learns patterns from many examples and tries to rebuild missing detail. For architects, this can turn a soft render or screenshot into something sharp enough for client decks or boards.
In architectural visualization, ai upscaling is usually applied to final images, not raw 3D models. You export a JPEG or PNG from your render tool, then pass it through an AI upscaler to increase size and enhance edges, materials, and text. The goal is to save time and avoid running a heavy render again just to print bigger and cleaner.
How AI Upscaling Differs from Traditional Image Resizing?
Traditional resizing tools just interpolate pixels. They blend existing colours and create new pixels in between, which often leads to blurred lines and soft details. This can be enough for simple photos, but it usually hurts thin linework in plans, facades, and sections.
AI upscaling works more like a pattern finder. The model has seen many textures, edges, and shapes, so it predicts sharper lines, clearer materials, and cleaner noise levels. In other words, it does not only make the image bigger, it tries to make it look more detailed at that new size. For architecture, this can help keep window frames, joints, tiles, and text more readable.
Common Use Cases for Architects and Visualization Studios
Architects and archviz teams use ai upscaling in a few typical moments. One is when an image that looked fine on screen now needs to go on a bigger slide or board. Another is when you only have a low resolution render from an old project and want to bring it up to today’s standard.
Common scenarios include:
Making website and portfolio images look crisp on large displays
Preparing last minute competition boards from existing renders
Cleaning up screenshots from Revit, Archicad, or SketchUp
Upscaling stills from animation frames for print or sharing
In all these cases, ai upscaling acts as a rescue and polish step. It does not replace careful rendering, but it can upgrade what you already have so it works better in real architectural communication.
When Do Architects Actually Need AI Upscaling?
You do not need AI for every image. A clean render at the right size is usually good enough. AI upscaling becomes useful when the image you already have is too small, slightly soft, or you cannot access the original scene to render again. In those moments, it can rescue a good view without touching the 3D file.
Think of ai upscaling as a support option when changing the model is not practical. It helps when you want to reuse old work, print something larger than planned, or make quick screenshots look more professional. If you are still deep in design and can easily render again, a fresh high resolution render is usually the cleaner choice.
Typical Resolution Problems in Renders, Screenshots, and Scans
Architects see the same resolution problems again and again. For example:
You rendered at 1920 x 1080 for screen, then later need an A3 or 11x17 printer
You only have a presentation screenshot, not the original export
You scanned hand drawings at low dpi and now they look grainy
You exported from BIM too small and text becomes hard to read
In these cases, ai upscaling can rebuild sharper edges and reduce pixel noise. It will not fix bad composition or wrong lighting, but it can turn “too small to use” into “good enough for presentations and boards”.
Using AI Upscaling for Portfolios, Competitions, and Client Decks
Portfolios, competitions, and client decks push images very hard in size. You often place one render full width on a slide or print it big on a board. If the source file is small, any scaling quickly shows blur and jagged edges.
AI upscaling is useful here for:
Turning older projects into portfolio ready images
Making hero renders sharp enough for full slide backgrounds
Preparing competition panels when you cannot re render in 4K
Used with a short visual check, ai upscaling lets you present a clean, consistent set of images even when the original files come from different years and tools.
How AI Upscaling Works Behind the Scenes? (Simple Explanation)
AI upscaling looks complex, but the idea is straightforward. The model studies many images and learns how edges, textures, and shapes usually behave. When you feed it a small render, it uses that training to guess what a higher resolution version should look like. For architects, this means sharper facades, cleaner windows, and smoother materials from the same original image.
You can think of it as a very smart enhance button. Instead of stretching pixels, it tries to rebuild new believable detail that fits the scene. It does not know your exact building in real life, but it has seen many similar patterns, so it can make an educated guess that looks natural to the eye.
From Pixels to Patterns: How The Model “Guesses” Missing Detail
At low resolution, the computer sees blocks of colour, not bricks or tiles. A trained model learns that certain pixel patterns often belong to things like glass, concrete, wood, or leaves. When you upscale, it looks at each area and asks what kind of surface it is likely to be, then draws a sharper version of that surface pattern.
For example, on a facade, the model may recognise vertical strips as window frames and horizontal lines as slab edges. It then sharpens those lines and fills gaps in a way that fits the building. On interior shots, it can smooth noisy shadows and refine fabric, timber, or stone textures so the image feels more detailed.
Strengths and Limits of AI Upscaling for Linework and Textures
AI upscaling is strong when the image already has clear structure and good lighting. It can make edges cleaner, reduce pixel noise, and add gentle texture to materials. This works well on facades, night renders, and atmospheric views where overall mood and readability matter more than millimetre accuracy.
The limits appear when details are tiny or unclear. Very small railings, mullions, balusters, or text can be guessed wrong and become thicker, thinner, or slightly shifted. The model may also invent texture where you wanted a very smooth surface. That is why architects should always treat ai upscaling as a visual polish step, then zoom in and check that the result still matches the real design intent.
AI Upscaling in ArchiVinci: Simple 4x and Generative 2x
ArchiVinci includes a built in AI Upscaler designed for architectural renders. It offers two clear modes that match different needs. Simple 4x focuses on clean enlargement, while Generative 2x can also refine detail and correct small issues. Both options work on your final images, so you do not need to re render your whole scene.
The key idea is to pick the mode that matches your risk level and deadline. If you want something safe and predictable, Simple 4x keeps the design almost identical. If you want more improvement on noisy or old images, Generative 2x can push quality further, as long as you review the result carefully.
When to Use ArchiVinci Simple 4x Upscaling on Architectural Renders?
Simple 4x is the safe option when you only need a bigger, sharper version of your image. It multiplies the resolution up to four times while trying to keep edges, forms, and tones as close as possible to the original. For architects, this is ideal when the design is final and you only want cleaner prints or higher resolution boards.
Typical uses for Simple 4x include:
Preparing large prints for client meetings and exhibitions
Making hero renders sharp enough for full slide backgrounds
Upscaling images before sending them to graphic designers or publishers
Because Simple 4x avoids heavy changes, it respects linework, proportions, and layout very closely. You still need to zoom in and check windows, railings, and small text, but the risk of unwanted design changes stays low. It works best on already solid renders where you just need extra resolution and clarity.
When ArchiVinci Generative 2x is Better for Detail Recovery and Tweaks?
Generative 2x is the stronger enhancement mode. It doubles the resolution and also tries to rebuild missing or weak detail. This can help when your base image is a bit noisy, slightly blurry, or exported smaller than ideal. The model looks at patterns in your render and adds more convincing material texture and edge sharpness.
Generative 2x is useful when:
You want to upgrade older projects for a new portfolio
A key render is too soft, but you do not have time to rerender
You need more visible texture on stone, timber, or fabric surfaces
Because this mode is more creative, it can sometimes adjust tiny elements like thin rails, mullions, or distant furniture. That is why it is best used when you plan to review the image with a critical eye. A simple rule is: Simple 4x for safe enlargement, Generative 2x for rescue and improvement when the original file is not strong enough on its own.
Benefits of AI Upscaling for Architectural Renders
When used at the right time, AI upscaling saves production effort while keeping images clear. It lets you push an existing render to larger sizes for screens and print without opening the 3D scene again. For busy architects, this often means more time for design and coordination instead of pure rendering work.
It is especially helpful when you are happy with the camera, lighting, and mood, but the resolution is simply too low. In that case, upscaling acts like a technical upgrade. You keep the same story and framing, but the result becomes suitable for slides, boards, and portfolios.
Sharper Façades, Materials, and Night Shots without Full Re Rendering
One clear benefit is how much cleaner facades and elevations can look after a good upscale. Small frames, mullions, and balconies often appear sharper, so the building feels more precise on large slides. Materials like brick, stone, timber, and metal gain subtle clarity, which helps when you zoom or crop.
Night and dusk renders also gain from upscaling. AI can smooth noisy shadows and refine glow around windows and lights, which makes the image easier to read. If the original file already had a strong mood, upscaling turns it into a presentation ready hero shot with minimal extra work.
Improving Old Projects and Low Resolution Imagery for Reuse
Many architects have older projects with good ideas but small or noisy images. AI upscaling lets you bring these into a new portfolio or website without rebuilding everything. You can clean up scans of printed boards, low dpi exports, or screenshots from old software versions.
This is also useful when a client wants to see past work at higher quality. Instead of rebuilding the scene, you upscale the best existing views and place them in new brochures or decks. Over time, a small pass of careful upscaling on your archive can turn a mixed folder into a coherent, high resolution project library.
Risks and Artifacts: Where AI Upscaling Can Fail
AI upscaling is helpful, but it is not magic or perfect. The model sometimes guesses wrong and changes small parts of the image. For architecture, these mistakes can show up on thin details, repeated elements, or places where the original file is very unclear. That is why every upscale needs a short quality check, not blind trust.
The main risk is that the image looks sharper at first glance, but some elements no longer match the real design. A balcony line may move a little, a frame may get thicker, or a pattern may look too decorative. Used without review, ai upscaling can turn a precise drawing into something slightly misleading in front of clients.
Distorted Details on Curtain Walls, Railings, and Furniture
Architectural images are full of repeated small parts. Curtain wall grids, balcony railings, louvers, and chair legs all create tight patterns. AI upscaling can sometimes bend or break these patterns if the original resolution is very low. A perfect grid might become uneven, or railings may merge into thicker blocks.
Furniture and decor can also suffer. Very small chairs, plants, lamps, or books may change shape or lose clarity. In plans and sections, thin lines can join together or disappear if the model reads them as noise. This is why it is important to zoom in after upscaling and check all critical elements before you send a file to clients or print large boards.
When AI Upscaling Can Change Design Intent or Mislead Clients?
The biggest problem is not a single wrong pixel, but a change that shifts the design story. If window sizes, frame thickness, or panel joints look different after upscaling, clients might form the wrong idea about proportion and rhythm. For architects, these are key parts of the project, not small decoration.
To avoid this, treat ai upscaling as a visual polish, not a design tool. Use it on final images where geometry is already clear, and always compare the upscaled version with the original. If anything important looks noticeably different, keep the original or try a more conservative setting. The goal is to make your work clearer and cleaner, never to change what you actually designed.
AI Upscaling vs Re Rendering: Which Should You Choose?
Sometimes it is faster to upscale what you have, sometimes it is safer to render again. The right choice depends on time, budget, and how accurate the image must be. For quick presentations and internal reviews, ai upscaling is often good enough. For final boards, marketing campaigns, or detailed design reviews, a fresh high resolution render is usually the better base.
Time, Cost, and Quality Trade Offs for Architectural Visualization
AI upscaling wins when you have limited time and a decent image. It is fast, low cost, and does not lock your computer for hours. You keep the same camera and lighting, and simply push the file to a higher resolution. The trade off is that small errors or noise in the original may still be present, only now more visible.
Re rendering wins when you need maximum control and long term quality. You can adjust samples, resolution, and lighting to get cleaner raw output. This is ideal for hero shots, key marketing views, and images that will live in your portfolio for many years. It costs more time, but every pixel comes directly from the 3D scene.
A Simple Decision Flow for Choosing Upscaling or Fresh Renders
You can use a simple checklist:
If the image is small but clean, try ai upscaling first
If the image is noisy or badly lit, re render instead
If the client will make design decisions from it, prefer fresh renders
If it is for web, social, or quick internal decks, upscaling is usually fine
In practice, many architects mix both. They render a few key views at high resolution, then use ai upscaling on supporting images to keep the whole set consistent and sharp without overloading their machines.
Best Practices for Using AI Upscaling in an Archviz Workflow
AI upscaling works best when you prepare the image well and check the result with a calm eye. A few simple habits make a big difference in quality. Think of it as good model hygiene for your final renders.
If you follow clear steps for input resolution, file format, and review, the tool becomes predictable. You then use AI as a clean helper in your pipeline, not as a random filter. This keeps your architectural images sharp, honest, and easy to reuse across many projects.
Recommended Input Resolutions, File Formats, and Export Settings
AI upscaling likes images that are small but not tiny. If the base file is extremely low resolution, the model has almost nothing to read and will guess too much.
As a simple rule, try to:
Render or export at least around 1600-2000 px on the long side
Use PNG or high quality JPG, not heavily compressed screenshots
Avoid overlays like bright red markups before upscaling
If you work in ArchiVinci, export a clean render first, then run Simple 4x or Generative 2x on that file. This keeps the model focused on geometry and materials, not on UI panels, grids, or annotation clutter.
Checking Drawings, Signage, and People for Subtle Errors
After upscaling, always do a quick zoom tour around the image. You are looking for small things that might be wrong, not just general sharpness. Focus on:
Text and signage on facades, plans, and diagrams
People silhouettes, hands, and faces in busy scenes
Thin elements such as railings, stair edges, and window frames
If text looks strange, people feel distorted, or details changed thickness, consider using a softer setting, switching from Generative 2x to Simple 4x, or re rendering that view. A two minute check like this keeps AI upscaling as a trustworthy helper instead of a silent source of mistakes.
AI Upscaling for Different Output Channels
Architects show the same image in very different places. A render might live on a website, in a PDF, on social media, and on a printed board. Each channel has its own resolution and sharpness needs. AI upscaling helps you adapt one good image to several outputs without re rendering every time.
The trick is to match image size to the real use case, not just export the biggest file possible. Web and slides need lighter files that still look crisp. Prints and posters need more pixels and careful checks. With a simple plan, you can prepare a few versions from one master upscale.
Using AI Upscaling for Web, Social Media, and Online Portfolios
Screens are more forgiving than print, but they still show soft images quickly. A clean upscale lets your work look sharp on laptops, tablets, and big monitors. You can start from a strong base render, upscale once, then export smaller copies for each platform and ratio.
Simple tips for screen use:
Keep a high resolution master for your archive
Export lighter JPGs for web and portfolio sites
Crop vertical or square versions for social media posts
AI upscaling is useful here because it keeps edges and materials clear, even when you crop or resize again. Your projects then feel consistent across platforms, from your website to social feeds.
Printing Large Boards and Posters without Losing Sharpness
Print is less forgiving. Any blur or pixelation becomes very obvious on A2, A1, or 11x17 boards. If you only have a small original render, upscaling is often the only way to reach safe print resolution without going back into the 3D scene.
Good habits for print:
Aim for enough pixels to reach around 150-300 dpi at final size
Upscale before you add text, logos, and diagram overlays in layout software
Always print a small test sample before sending a big batch to the plotter
If the upscaled image looks clean on a small physical test, it will usually hold up well on the final board. This keeps your walls and pin ups looking professional and readable, even when projects come from different years and tools.
How AI Upscaling Fits with Other AI Tools in Architecture?
AI upscaling is strongest when it sits next to other tools, not alone. In a typical workflow, you might use AI for rendering, denoising, and colour balance, then finish with upscaling as the last polish. ArchiVinci fits here as the main render engine, while its AI Upscaler lifts resolution for final outputs. The result is a smoother path from rough idea to final presentation image.
Combining AI Upscaling with AI Rendering, Denoising, and Color Grading
A simple modern pipeline can look like this. You create your base image with AI rendering or a classic renderer. You then use denoising and light colour grading to fix noise and mood. Finally, you apply ai upscaling to push the image to a higher resolution for print and large screens.
In ArchiVinci, this is very natural. You generate the render in the right module, adjust if needed, then send it to Simple 4x or Generative 2x for upscaling. If you colour grade in other software, always do that before the final upscale, so you do not reintroduce noise. This keeps your files clean and makes each AI step a clear, controlled stage instead of a random chain of filters.
Where Humans Still Add Value in an AI Heavy Visualization Pipeline?
Even with strong AI tools, humans still make the key decisions. Only you can decide the right camera, composition, and story for a space. AI can sharpen pixels, but it cannot know if a balcony depth or window rhythm is technically correct for your project.
Your value sits in three things. First, setting clear design intent before any rendering starts. Second, choosing which AI outputs are worth keeping and which look fake or confusing. Third, checking every important image after upscaling so it matches real dimensions, structure, and project standards. Used this way, AI becomes a helpful assistant, while you stay the author of the architecture.
Key Takeaways: Does AI Upscaling Really Work for Architects?
For architects, ai upscaling does work when it is used with clear limits. It is strong at turning small but decent images into larger, sharper visuals for screens and print. It also helps update older projects for modern portfolios and presentations. The main rule is to always check that thin details and key elements still match the real design.
Key Points to Remember About AI Upscaling
AI upscaling is most helpful when you already have a solid base render and you just need more resolution.
You can keep these points in mind:
Use ai upscaling to resize clean but small images for slides, boards, and portfolios.
Prefer Simple 4x in ArchiVinci when you want safe enlargement that keeps geometry and composition close to the original.
Choose Generative 2x when you need extra help on older, softer, or slightly noisy renders and can review the result carefully.
Always zoom in and check thin details, text, and people so the model has not changed anything important.
Re render instead of upscaling when lighting, camera, or design intent are wrong, or when the image will guide critical decisions.
Treat ai upscaling as a finishing step, not a shortcut for design work, so your images stay honest and professional.
Frequently Asked Questions
Can I Use AI Upscaling on CAD Drawings and Technical PDFs?
You can use AI upscaling on raster exports of CAD drawings or PDFs, but not on true vector files. First you need to export the sheet as a high quality image, then run the upscaler on that image. It can make linework and hatches clearer, but you must zoom in and check that thin lines, dimensions, and text labels stay readable and accurate. For anything legally binding, always keep the original vector or PDF as the primary reference.
Is AI Upscaling Safe for Planning Submissions or Only for Marketing Visuals?
For planning submissions and technical reports, you should treat ai upscaling very carefully. It is fine to use it on context views, massing perspectives, and atmospheric images, as long as you confirm that geometry still looks correct. For scaled drawings, dimensions, and legally sensitive documents, it is usually safer to rely on native CAD or BIM exports without AI changes. A good rule is: AI for explanation and mood, native outputs for official documentation.
Does AI Upscaling Work on Animations or Only Still Images?
AI upscaling usually works on individual frames, so you can apply it to stills taken from an animation. If you want to upscale a full video, you need a tool that handles frame sequences and keeps motion consistent. For many architectural projects, a practical approach is to upscale a few key frames for posters, covers, and thumbnails, while leaving the animation at its original resolution. This keeps quality high where it matters most, without a huge processing cost.
How Big Can I Print an Upscaled Image without Losing Quality?
The safe print size depends on the final pixel count after upscaling and the viewing distance. As a rough guide, aim for roughly 150-300 dpi at the target print size and do a small test print before plotting large boards. If the test looks clean at arm’s length, it will usually work for A2, A1, or 11x17 sheets. When in doubt, choose slightly smaller print sizes or keep key drawings a bit larger on the page.
Do I Need a Powerful GPU to Use AI Upscaling in My Workflow?
Most cloud based tools, including platforms like ArchiVinci, run ai upscaling on their own servers, so you only need a stable internet connection and a modern browser. Your local GPU matters mainly if you use desktop upscaling software installed on your machine. In typical practice, you can generate or upload the render, trigger upscaling from the interface, and download the result without touching hardware settings. This makes it easy to add AI upscaling even on a standard laptop.
Can AI Upscaling Fix Heavy JPEG Compression or Very Bad Source Images?
AI upscaling can reduce some blockiness and noise, but it cannot fully repair a badly damaged image. If the source is extremely compressed, has banding, or is out of focus, the model has very little real information to work with and will start to guess too much. You might get a slightly smoother or cleaner result, but fine details and text will not magically reappear. Whenever possible, try to locate a better export or re render before relying on AI to rescue a broken file.
Can I Batch Upscale Many Images for a Big Project?
Some AI tools support batch or queued upscaling, while others require one image at a time. A practical approach is to first sort your files into a short list of “key views” that truly need higher resolution, and only run upscaling on those. This keeps processing time under control and avoids filling your storage with very large files you will never use. If your chosen platform offers bulk actions later, you can always extend the same settings and process to a larger set of images.