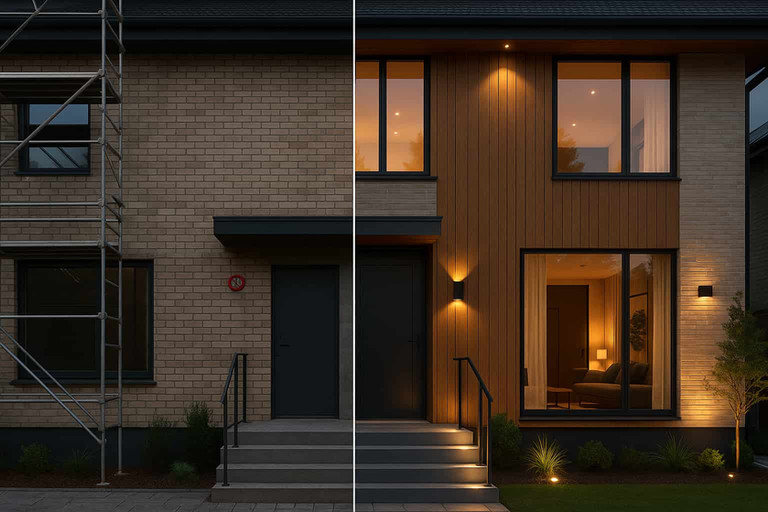
Updated on: 25 October 2026
Facade renovation is the repair and upgrade of a building's exterior walls, windows, doors and details: fixing cracks, damp and loose elements, replacing or overcladding worn cladding, adding insulation and improving how a house or building looks from the street.
This guide follows the order of the work: the signs that a facade needs attention and how it is inspected, when to repair, overclad or reclad, the eight steps of a renovation, what drives the cost, the permits to check, the energy upgrades to make at the same time and how to see the renovated facade on a photo of your building before work starts.
What is Facade Renovation?

On a house, facade renovation usually covers the siding or render, the windows and front door, the entrance, gutters and trim. On an apartment or office building it also covers balconies, railings, cornices, the roof edge and the fixings that hold the cladding in place.
The work ranges from repairs and a fresh coat of paint to stripping the old cladding, adding insulation and fitting new windows. Done well, it protects the walls from water and frost, removes loose elements before they become a danger, cuts heat loss and drafts and extends the life of the building without touching its structural frame.
Facade Renovation, Restoration or Refurbishment?
The words overlap, but they are not the same. Facade restoration brings back the original: repairing and repointing masonry, cleaning brick or stone and replacing damaged details with matching ones, which is common on historic and protected buildings. Facade refurbishment is the usual British word for renovation. Recladding replaces the outer layer of the wall with a new cladding system, often with insulation behind it. When the building also changes its use, for example offices turned into homes, the project is adaptive reuse.
Signs Your Facade Needs Work
Walk around the building in daylight, ideally after rain, and look for patterns rather than single marks: the same crack over every window, a stain that always starts at the same corner. Deal with moisture and movement first, because a new finish on a wet or moving wall fails again. These are the most common warning signs:
Cracks that repeat at lintels, sills or corners, a sign of movement around the openings.
Peeling render, flaking paint or blistering, often moisture trapped behind the finish.
Efflorescence or damp stains at corners, parapets and the base of walls, where water moves through the wall.
Bulging, spalling or loose elements, a safety risk if pieces come away.
Cracked or missing sealant and missing or corroded flashings at joints, sills and edges.
Water marks below window heads, sills and balcony edges, tracing a leak from above.
Rust stains, a sign that hidden metal fixings or anchors are corroding.
Warped frames, stuck windows and drafts around windows, doors and outlets.
Cold walls, condensation or mold on the inside of exterior walls, pointing to insulation gaps or thermal bridges.
Uneven joints or uneven aging of panels and masonry, which often follow water paths or poor installation.
What Is a Facade Inspection?
A facade inspection is a close survey of the exterior walls and everything fixed to them, such as balconies, railings, cornices and anchors, to find damage before it becomes dangerous. For a house, a builder, surveyor or engineer can inspect from the ground, a ladder or scaffolding and list what needs repair. For tall buildings some cities make it a legal duty: in New York City, owners of buildings higher than six stories must have the exterior walls and their appurtenances inspected every five years, and a qualified exterior wall inspector files the report with the Department of Buildings (Facade Inspection & Safety Program). Elsewhere, ask your building department whether buildings like yours need periodic inspections.
Repair, Overclad or Reclad?
Once you know what is wrong, there are three ways forward, from the least to the most work:
Repair: patch cracks and spalled areas, repoint mortar joints, re-seal joints and flashings, fix or replace loose elements and repaint. It fits a sound wall with local problems.
Overclad: add insulation and a new finish over the existing wall, for example external wall insulation with a render finish (EWI, known as EIFS in the US) or a ventilated rainscreen. It fits a sound wall that loses too much heat or looks worn.
Reclad: strip the old cladding and replace it, usually with new insulation and fixings. It is needed when the cladding itself has failed, is unsafe or has to come off.
Two points from England's Planning Portal show what to check first. Cladding is not recommended on structurally unsound walls, so structural repairs come before any new layer. And where 25 per cent or more of an external wall is re-rendered or re-clad, the building regulations would normally apply and the thermal insulation would normally have to be improved (building regulations for external walls). Other countries set their own thresholds, so ask your building department before you decide (see the permits section below).
For the new finish itself, our guide to house facade ideas lets you compare facade materials such as brick, stone, timber, render, fiber cement and metal, with their upkeep, colors and US costs. To judge a cladding on your own building before you order it, mark the wall on a photo in ArchiGPT, ArchiVinci's image editor (the Edit module), and apply one of the 103 materials in its texture library or a sample of your own: only the marked area and a narrow margin around it are redrawn, and the rest of the picture stays as it is.

Example from our ArchiGPT page, made in the Edit module on the default engine: the wall was marked with Select, then Apply texture with a brick from the library and the prompt "apply this brick to the wall". Left: the image before the edit. Right: only the marked wall was changed.
Preview new cladding on a photo of your facade Upload a photo of the building, mark the wall with the brush or the lasso and apply a material from the texture library or your own sample: only the marked area is redrawn. A new account starts with 3 free credits. |
How to Renovate a Facade in 8 Steps
Whether it is a house or an apartment building, a facade renovation runs best in this order: diagnose first, decide second, build last.
Inspect and diagnose. List every sign of damage, find the cause of any damp or movement and, when in doubt, have a builder, surveyor or engineer inspect the facade before anyone quotes.
Set the scope and one priority. Decide between repair, overclad and reclad, and what matters most: safety, lower energy bills, a new look or resale value. One clear priority keeps later choices simple.
Check permits, fire rules and grants. Ask the building department what the work needs, above all for new cladding, new or larger openings, protected buildings and tall buildings (see the permits section below).
Measure and document today's building. Take straight-on photos of every elevation and note the size of each opening. A phone's measuring app gives approximate figures that suit openings and details better than a whole elevation. To draw the plan with wall lengths and room areas, Floor Plan Maker lets you draw it by hand over a picture of an old drawing, with the scale set from one known length, or start from scratch, set each window's width, height and sill, view the house in 3D and export a PDF or DXF for the contractor; drawing, 3D and exports are free in a desktop browser. For photos and notes on site, see our list of home renovation apps.
Preview two or three options on a photo. See a whole new facade, or change one wall or window, before you commit (see the preview section below).
Write a one-page spec and get quotes on the same scope. List the cladding, insulation, fixings, joints, windows and finishes with their quantities, and ask two or three contractors to price exactly that. When several trades are involved, share one set of images: today's photo, the chosen option and a short legend of materials and colors. An AI render generator turns an elevation sketch or a model view into a photorealistic image in seconds, which helps people who do not read drawings; dimensions, details and quantities still come from the drawings and the spec.
Phase the work and approve a mock-up. Fix the envelope before the finishes, group the trades by elevation to cut scaffolding time, approve one mock-up panel on site before bulk orders and plan the main work for mild, dry months.
Hand over and keep the records. Collect written warranties for the cladding, membranes and coatings, the product data sheets and a simple care schedule with cleaning methods and re-coating intervals.
How Much Does a Facade Renovation Cost?
There is no fair price per facade without a survey: the cost follows what the wall needs and how hard it is to reach. These are the main cost drivers:
Wall area and height: the square feet or square meters to treat and the number of floors.
Access: scaffolding, lifts or rope access, and any permit to occupy the sidewalk.
Hidden repairs: cracks, spalled masonry, rotten timber or corroded fixings found once the old finish comes off.
Cladding and insulation: the system and its thickness; insulation also moves window sills, flashings and downpipes.
Windows and doors: replaced or adjusted at the same time.
Fees: design, engineering, inspections and permits.
Local labor rates and the season.
For a sense of scale in the US, the 2025 Cost vs. Value Report put the national average for replacing siding with fiber cement at $21,485 and for adding manufactured stone veneer at $11,702 (table reprinted in DASMA's magazine); our house facade ideas guide shows how much of such costs came back at resale. A professional home energy assessment, which finds air leaks before you insulate, cost approximately $250 to $600 or more in the US Department of Energy's 2021 consumer guide. Compare quotes on the same written scope, per square foot or square meter, and keep a reserve for what the opened wall reveals.
Some countries support energy upgrades with grants or tax relief, and the rules decide which work qualifies and who can claim, so check them before you sign a contract.
Permits and Rules to Check Before You Start
Facade work is visible from the street, so it is more regulated than work inside. Before you fix the design, check these points:
Planning or zoning permission for a changed look: different cladding, new or larger openings, or new colors in protected areas.
Building regulations or codes: insulation when you re-render or re-clad, the fire performance of the new cladding and its cavity barriers, and structural fixings.
Heritage rules for listed or historic buildings and conservation areas.
Homeowners association or condominium rules, which can set colors and materials.
Street permits for scaffolding, hoists or containers on the sidewalk, and an early word with the neighbors.
England shows how much depends on the place. According to the Planning Portal, repairs, maintenance and minor improvements such as painting need no planning permission, and a listed building needs listed building consent for significant works. Cladding with stone, artificial stone, pebble dash, render, timber, plastic or tiles needs planning permission in a Conservation Area, a National Park, an Area of Outstanding Natural Beauty or the Broads; elsewhere it needs none if the materials look similar to the existing ones.
In the US, ask your city or county building department and any homeowners association before you start, and for new cladding ask the supplier for the system's fire classification and test documentation. Photos of today's facade, existing and proposed elevations and a list of materials and colors are often all an office or a contractor needs to get started, so prepare them early.
Energy Upgrades: Insulation, Air Tightness and Shading
It helps to think of the facade as a complete system rather than a set of individual upgrades. Continuous insulation behind cladding, careful detailing at lintels and slab edges, and a ventilated cavity all work together to manage heat and moisture over time.
Air tightness often comes down to small details. In a professional energy assessment, a blower door fan lowers the indoor air pressure and the auditor finds leaks around frames and junctions with a smoke pencil; the US Department of Energy's guide to home energy assessments also describes a simpler do-it-yourself check with an incense stick on a cool, windy day. Sealing these gaps usually improves comfort far more than surface changes.
Shading is most effective where the sun is strongest. Exterior blinds, fins or modest overhangs can reduce glare and summer heat while still letting winter light in. To see which walls get the most sun, draw the house in a free floor plan creator such as Floor Plan Maker and turn the sun direction control in its 3D and massing views.
Glazing choices also play a role. Low-e glass with a solar factor suited to the local climate helps balance heat gain and daylight; in the US, check the window's NFRC label against the ENERGY STAR criteria for your climate zone, which differ from zone to zone. Testing materials in different light conditions, especially day versus evening, helps ensure colors and reflectivity stay true.
Quick Wins Checklist
A clear, continuous insulation line, with membranes neatly taped and flashings detailed cleanly
Window and door frames set square, gaskets in good condition and ventilation openings checked
Exterior shading sized to each opening, paired with warm, consistent outdoor lighting
Windows, Doors, Lighting and the Entrance
Replacing Windows and Doors
Openings decide much of how a facade looks and performs. When windows or doors are replaced, line them up across floors, keep frame depths and sill details consistent and check how much deeper the reveals become if insulation is added. Better glazing and seals keep warmth in, cut drafts and reduce outside noise, so compare the certified U-value (U-factor in the US) of each option, and do not forget vents, gaskets and outlet seals.
To see slimmer frames or a taller door on your own house, mark the windows or the door on a photo in ArchiVinci's Edit module and describe the change: only the marked area is redrawn, so you can change windows and doors on a photo and keep the rest. Compare two or three versions side by side: the picture shows proportions and character, while the insulation gain comes from the window's certified rating and the supplier's drawings.
Exterior Lighting
A facade should look calm after dark, not overly bright. Layer the light: a soft wash on one wall, even light on the steps and the path and a subtle accent at the entrance. Keep the color temperature warm and consistent (around 2700 to 3000 K is a common choice) so brick, timber and metal look natural, and use shielded fixtures to avoid glare on the glazing and light spill onto the street and the neighbors.
To compare how the new materials read in low sun and after sunset, ArchiVinci's AI rendering runs the same upload with lighting buttons such as Golden hour and Twilight; Twilight gives dusk with the lights on. No button gives a full night scene: for that, upload the image to the Edit module and ask for it in words, as on our AI relight page; to try a wall light in one spot, mark the spot and describe the fitting.
Example from our AI relight page, made in the Edit module from a daytime view of a house from the street with the prompt "Change the lighting to dusk: a deep blue sky just after sunset, warm light on in every window and the lamp by the front door switched on." Left: the uploaded image. Right: the result.
The Entrance, Steps and Planting
The entrance is often the first thing people notice, so small decisions matter here. Aligning the door height with nearby windows, lighting the steps evenly and choosing railings that follow the facade's rhythm all help create a clear, welcoming arrival; when you rebuild steps or railings, check them against your local building code.
Planting works best when it supports the architecture rather than competing with it: a slim planting strip can soften the base of a wall without hiding its details. On our AI landscape design page, the Exterior module redraws the planting around the house from a photo: describe low shrubs or tall grasses, and each run returns a new image that follows your photo.
See the Renovated Facade Before You Commit
Samples show a material, not a building. Before you sign off the scope, look at two or three directions on a photo of your own facade.
For a whole new facade, upload a straight-on photo of the building to the Exterior module, ArchiVinci's tool for AI exterior design, and describe the renovation in a sentence. It returns a new image that follows your photo in seconds; every run draws a new image, so details can change and should be checked. On free credits each run gives one image, and with a plan one run returns up to four versions to compare. To change only one wall, the windows or the entrance, mark that area in the Edit module instead, as shown above.
Describe the Renovation in One or Two Sentences
Name what must stay, such as the window positions and the roof line, and what changes, such as the materials and colors, and choose the light with a lighting button rather than in words. Keep the same photo and the same button for every run and change one thing at a time, the cladding first and the openings next, so the differences are easy to read. For example:
Renovated front facade: keep the window positions and the roof line, light brick on the ground floor, vertical timber above, slim black window frames, clean joints.
Download the versions you like (JPEG) and put today's photo and the options side by side on one sheet for the client or the contractor. Using the images for client work or marketing needs an active plan, and plans are on the pricing page.
Upload your facade and explore new options Upload a photo of a house or a building, describe the style, materials and colors for the facade, and ArchiVinci shows the exterior redesigned. A new account starts with 3 free credits. |
Common Facade Renovation Mistakes
Putting a new finish on a wet or moving wall before the cause of the damp or the cracks is fixed.
Choosing the cladding before checking permits, fire rules and insulation requirements.
Leaving water paths such as drip edges, flashings, sills and weep holes until problems appear on site.
Adding insulation without rethinking window reveals, sills, downpipes and the roof edge.
Mixing too many materials instead of one main surface with one or two quieter ones.
Comparing quotes that price different scopes.
Using harsh, poorly shielded lights that glare on the glazing at night.
Letting drawings, photos and site measurements drift out of sync, or changing scale and file names halfway through.
Key Takeaways
Diagnose before you design: find the cause of damp, cracks and loose elements first.
Repair, overclad or reclad: a sound wall can be repaired or overclad; failed or unsafe cladding has to come off.
Check the rules early: planning, building regulations, heritage status, fire performance and, for tall buildings in some cities, periodic inspections.
The cost follows the wall: area, access, hidden repairs, insulation and windows drive it, so compare quotes on the same written scope.
Envelope first, finishes last: insulation, air tightness and water paths decide how long the new finish lasts.
See it before you build it: test two or three options on a photo of your own facade before work starts.
Try it in ArchiVinci
Upload a photo of the facade you want to renovate and describe the new cladding, windows or colors in a sentence: ArchiVinci generates a new image that follows your photo, in seconds. A new account starts with 3 free credits.
From a sketch: AI sketch to render
To restyle a render or a photo: AI image style transfer
Frequently Asked Questions
How much does it cost to change the facade of a house?
It depends on the wall area, the access, the repairs the wall needs, the cladding and insulation and local labor rates, so ask two or three contractors to price the same written scope. As a US reference, the 2025 Cost vs. Value Report put replacing siding with fiber cement at $21,485 on average; the cost section above lists what drives the price.
How do weather and season affect scheduling?
Cold or wet conditions slow curing of render, paints, and sealants. Aim major exterior works for mild, dry months. Protect open joints with temporary flashings if weather turns.
What about warranties and maintenance plans?
Ask for written warranties on cladding, membranes, and coatings, and a simple care schedule. Note cleaning methods, re-coat intervals, and which chemicals to avoid.
How do I manage neighbors, access, and scaffolding?
Share dates, working hours, and contact info early. Confirm scaffold tie points and pavement permits. Plan quiet tasks for early hours and noisy ones for mid-day.
Are there fire and safety considerations for new cladding?
Yes. Verify local fire ratings, cavity barriers, and fixings. Use tested systems with documentation, and keep a continuous fire-stopping strategy at floor lines.
Can I integrate modern tech like cameras, doorbells, or sensors?
Plan conduits before closing the façade. Group low-voltage points near entries, hide power supplies, and test night glare on lenses after fixture placement.
How long does a typical façade renovation take?
It depends on the scope, the size of the building, access, the weather and approvals, so ask each contractor for a schedule by elevation. Repairs and a repaint on a house take far less time than overcladding with insulation and new windows, and permits, material lead times and the weather can add time before and during the work.
In what order should you renovate a house?
Work from the outside in and from the structure to the finishes. Roof, structural repairs and anything that lets water in usually come first, then windows and doors, then insulation and cladding, and only then interior finishes, paint, lighting and planting. On the facade the same rule applies: repairs and water paths before insulation, insulation before the new finish.
Can you upload a picture of your house and change the exterior?
Yes. Upload a photo of the house to the Exterior module, describe the new facade in a sentence and ArchiVinci generates a new image that follows your photo, in seconds; you can redesign the exterior on a photo with the 3 free credits of a new account. To change only one wall, the windows or the door and keep the rest, mark that area in the Edit module.